

With wedding season around the corner and many brides planning to send invitations soon, I thought an etiquette and DIY invitation post would be fun and appropriate.
For my own wedding, I was not yet practicing calligraphy and was unaware of some of the proper ways to address certain household situations. So as my mom and I came across questions while addressing the envelopes, we turned to Emily Post’s Etiquette and Google. Since picking up the art, I have done the calligraphy for several weddings and even more questions popped up. So here is a quick guide for common etiquette questions while addressing envelopes:
 |
| photo source |
► RETURN ADDRESS
The host’s (party responsible for the majority of the costs) address is typically embossed or printed on the outer envelope. This is an option that your printer will give you when ordering invitations. My mom and I chose to go with an embossed return address and now my parents have a nice little embosser that cost about $40.
► RSVP
You should include a pre-addressed, stamped envelope for the reply. It should be addressed to whoever is keeping the guest list.
► FORMALITY
Your wedding will probably be the most formal affair you put together, so give your invitations proper
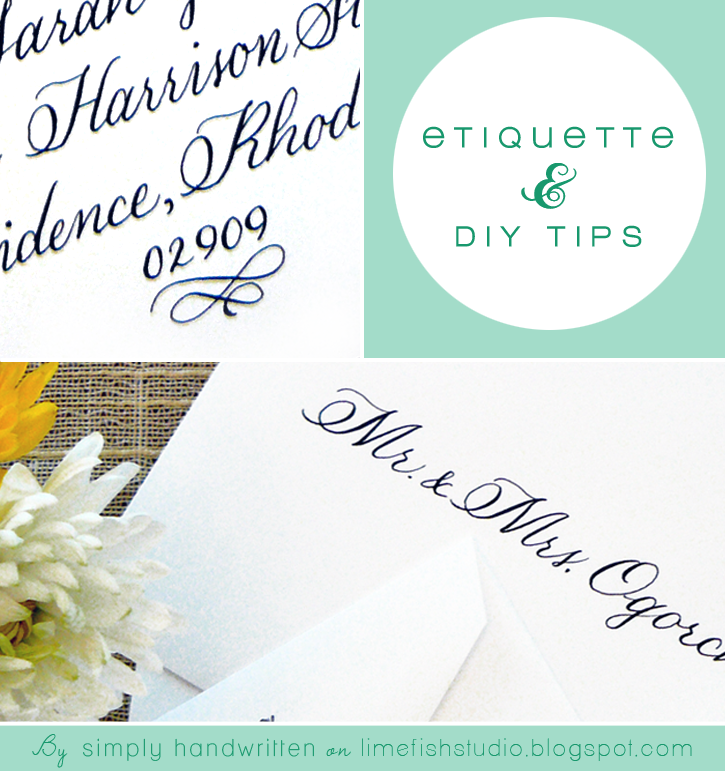
courtesy of formality. Use titles and remember to spell everything out except for numbers over 20 and titles (this includes Boulevard and Massachusetts). For a married couple with the same last name, you write “Mr. and Mrs. Jonathan Smith” followed by their address on the following lines. On the inner envelope, you may write “Mr. and Mrs. Smith.” If you want to be a little less formal or are particularly close to your guests, you can consider using familiar names (like first names or Granny) on the inner envelope.
Please note: all image addresses have been “smudged” to protect the privacy of others.
| For a less formal affair, play with the font and texture of your papers. |
| For a beach wedding, colored ink was used to match the colors. |
► LADIES FIRST
A good rule of thumb for etiquette on invitations and addresses is “ladies first.” For instance, unmarried couples living together should be listed on separate lines with the lady first. If the couple is married with different last names the lady is listed first, but an “and” is added to join them. Another place where this rule comes in handy is when the woman has a title such as Doctor or Captain. She is listed with her title followed by her spouse and his title, joined by an “and.”
► CHILDREN AND GUESTS
Personally, I think children make a wedding, but not everyone agrees and some enjoy an “adults-only” celebration. If children are to be invited, their names are written under the names of the parents on the inner envelope, not on the outer envelope with the address. If children’s names are not listed, then they are not invited. The same rule goes for the “and Guest” which should be listed next to the recipient’s name on the inner envelope.
 |
| For the above invitation, an inner envelope was not used and children and guests were listed along with the recipient and address. |
► WAIT. I NEED two ENVELOPES?
Yes (… in my opinion). I find that an inner envelope makes the invitation look clean and clarifies exactly who you are inviting. Sometimes outer envelopes are looked over quickly, leaving little time to notice that there is (or isn’t) an “and guest” written there. With an inner envelope, your guest can be clear on whether or not they can bring a guest or if their children are welcome at the wedding. While this isn’t necessary and all information can be included on the outer envelope, it’s a small fee to avoid some headaches down the road.
 |
| The inner envelope pictured at the top has only the names of those invited, making the invitation crisp and clear. |
► SPECIAL CIRCUMSTANCES
Did I not cover your particular situation? Did I mention Emily Post’s Etiquette? It really has everything you could ever need to know about etiquette and is free at the library!
► WHAT I DID FOR MY OWN WEDDING
Now that you know some etiquette on addressing, I’ll show you how we pulled together the invitation for my own wedding. With the help of my mom and sister, we were able to replicate the the trifold invitations my husband and I loved at the stationary store but was just out of budget.

Here is a break down of the supplies we used:
● Trifold Pocket (to hold invitation, RSVP, and reception cards) – from here
● Ivory and Watermelon Card Stock (for printed materials) – from here
● 2.25” Card Stock Squares – from here
● Glue
● “Belly Bands” (to hold it all together) – from here
● Envelopes (inner, outer and rsvp) – from here
● Trusted Printer – we used Charlottesville Press
● Talented Graphic Designer – I enlisted the help of my Sister, but Limefish Studio is always an option for you (wink wink).
{ Step 1 } DESIGN YOUR INVITE.
My sister designed the invitation and inserts to fit perfectly in the trifold card. She also designed the monogram to place on our belly-band. Don’t have someone in mind for the design work? You may like to give it a try on your own with Microsoft Publisher (30 day free trials) if you have patience, an eye for design, and a little computer literacy. Just remember that the insert cards (reception, rsvp, change of date!) should be ascending sizes in order for their titles to be seen properly.
{ Step 2 } ASSEMBLE YOUR INVITATIONS IN THE TRIFOLD.
{ Step 2 } ASSEMBLE YOUR INVITATIONS IN THE TRIFOLD.
Place your invitation on the card with a little glue and insert your rsvp and reception cards in the pocket. For the invitation here, we used watermelon card stock behind the invitation for a border. Also remember to have the rsvp envelopes pre-addressed (by your printer) and stamped.
{ Step 3 } ASSEMBLE YOUR BELLY BANDS.
The belly bands pull the invitation together. First, you mount your monogram (which I noticed can also be ordered through Cards and Pockets) onto the 2.25” square. Wrap the belly band around the card and secure with a small dab of glue. Glue your mounted monogram in the middle to cover where the ends meet.
Voila! There’s your invite. Now, address those envelopes or send to a calligrapher (now that you’ve saved so much by making your own invites) and you’re done! Just keep in mind that the invitation is the very first glimpse your guests will see of your wedding. So make it count, and best of luck!
anna from
a member of the 2013


.png)


Adorable Indian wedding cards - Invitation’s theme and fonts are important things to make it different and unique as well, and you have share here great font styles with great fonts creativity. I would like to use such kind of fonts which is hand written fonts.March 29, 2013 – 6:12 am
essex wedding venue - These cards have designed very well and politely. If you send these invites to your beloved relatives then I assure you that they will not refuse and must join you on your big day.April 25, 2013 – 1:43 am
Will - Love your blog! I’ve been looking for some inspiration on creating personalised stationery and this has really helped. Thank you!
June 20, 2013 – 10:00 pm
Danielle Marie - YAY 🙂 So glad to hear it helped 🙂 Thanks for your kind words too!June 23, 2013 – 9:39 pm
Joseph Clarke - Such wonderful invitations. I’m thinking of creating our own invitations for our wedding too. More power to your blog!June 26, 2013 – 10:03 am
Meow Opre - Awesome wedding invitations!I’m also browsing more so i could pin them on my Pinterest boards. Really lovely =DJuly 16, 2013 – 9:09 am
Wedding cards - Your simply handwritten diy wedding invitation fantastic & designs on them really amazing.April 23, 2019 – 8:10 am