 |
 |
I am so excited to be a contributor to Limefish Studio’s amazing blog! For my first post, I decided on an easy DIY project that was one of my first’s… a coffee filter wreath… but with an updated twist! This DIY Edge Dipped Coffee Filter Wreath is perfect for Valentine’s Day or choose any accent color that will spruce up your cozy home year round. This project is a cute, fast, and cheap (is there any better combination?!) project that I believe any DIYer can do- from the total novice to well-experienced.
You will need just a few simple supplies…
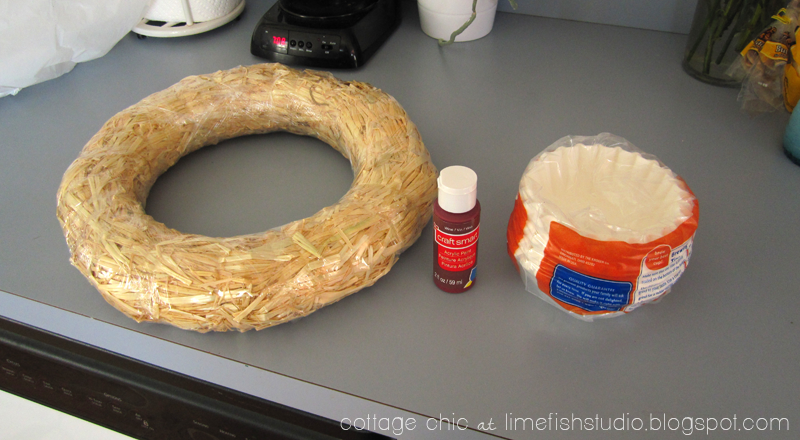

► 12 in natural straw wreath wrapped with plastic (found at Michael’s for about $4.00)
► Acrylic paint – I used Craft Smart brand in wine color (also found at Michaels for about $0.70)
► Coffee filters – I used Junior Basket filters for a 4 cup coffee maker (200 in the package). I choose the small size because of the size of wreath I wanted to make (and I planned on using the leftover filters for my 4 cup coffee pot!). If you choose a larger wreath, you may want to choose the larger size of coffee filter.
► Hot glue gun and glue sticks
 I wanted to dye the edges of the coffee filters pink for Valentine’s Day so I diluted some of the Acrylic paint with water so that the filters would absorb it. There is no magic recipe for this. I just squirted about 2 teaspoons into a shallow dish and added enough water so that it was about 1/4 an inch up the side of the bowl. This was so I could place the filters facing down in the dish for just a second until the color absorbed up to the level I wanted (1/2 in).
I ended up having to refill the paint/water mixture a few times and each time the density of the color came out differently- which was exactly the effect I was going for. I wanted the filters to have variations in the color- you just have to make sure to spread the different colors evenly throughout the wreath.

I used 2 and a half of the 4 stacks of filters that came in the package. I separated them into smaller groups so that they would be easier to separate after they dried – I did not take the time to dip one filter at a time (I wasn’t sure this would work, but luckily it did! I am not the most patient DIYer so luckily it worked out just fine!) I spread them out on waxed paper covered with a paper towel. The reason for this was 2 fold- 1 to not get paint all over my counter, and 2 to have the paper towel help absorb some of the extra liquid and make the filters dry faster. Once they were dry and separated- about half the day for me- I was ready to finish the wreath!
 |
| Can you tell Bentley was very interested in this project!? |
 Heat up your glue gun and get ready to go! Prepare a filter by pulling the center of the bottom and folding the filter over on itself 2-3 times. There is no perfect way to do this- some of mine I folded into a semi-circle and then folded over onto itself a few times, but did not crease it! It does not have to be perfect by any means- otherwise it will not look very natural! Put a dab of glue (about one trigger pull) onto the wreath and push the center point of the filter onto the glue. Repeat putting the next filter about an inch away and continue to cover the wreath with filters.
The key is to make sure they are evenly spread out- yet dense enough that you don’t see any of the wreath underneath or in the inside/outside of the wreath. You do not need to cover the bottom at all so that it will lay flat on the wall. There is no magic formula for this either- just do what you think looks good. You can spread out the filters or glue extra in- as long as it looks consistent over the entire wreath.
Continue gluing the filters until you are happy with the look- I had to go back and dye a few extra to fill out some less dense spaces. In the end- I’m super happy with the way it looks!! I think it looks like those carnations with the dark edges and I love it! Not only will it be beautiful for Valentine’s day, but it will also fit in with my Cottage Chic decor year round.
 |
 |
|
| … a member of the Limefish Studio 2013 Contributor Bubble … |


limefish studio - I can’t thank Megan enough for this wonderful DIY tutorial! I hope everyone is looking forward to many more inspiring posts from the lovely Contributors. Please comment and share your appreciation!February 6, 2013 – 3:37 pm
mel h - This is very cute! I bought a straw wreath the other day and was still trying to figure out what to do with it- I have a cinnamon stick wreath that I made on my door now but wanted something new. I am gonna go to walmart and get the rest of the supplies and do it tomorrow!February 6, 2013 – 3:48 pm
limefish studio - Mel…. That’s great news! Glad it inspired you and best of luck making your wreath! I Love the sound of the cinnamon stick one too…. I bet it smells delightful!February 6, 2013 – 4:59 pm
Meg Burford - I love it! Already headed to Michael’s for a straw wreath 😉February 7, 2013 – 7:50 am
limefish studio - Awesome!February 7, 2013 – 11:41 am